
 I have a passion for transforming trash into treasure– for repurposing potential throw-aways into absolute blow-aways.
And what I can find at my local ReStore often can be transformed from something ordinary into the extraordinary – like the table below, on sale for a mere ten dollars:

Clearly, the piece was mid-century modern, a style whose sleek lines are popular again today, but this table literally looked like something left over from 50 years ago. It was chipped, worn, unwanted.
However, one week later, with a little effort and imagination, the table has been transformed into this:
")
Here’s how I did it—and how you can, too:
1. Clean the surface with hot, soapy water.

2. Sand the top and legs.

3. Prime with a product like Kilz.

4. Lay out a design in pencil.
I used a yard stick to measure and assorted mixing bowls as circle templates.

5. Select areas to paint.
Use colors that will coordinate with the room where you’ll use the table.
And don’t forget the legs. I spray-painted mine black using a high gloss Rustoleum.

6. Select other areas to decoupage and search for images.
Use photos salvaged from recycled magazines or maps from an out-of-date atlas.
If you don’t already have a few back issues of National Geographic or old encyclopedias hanging around the house, you’ll find plenty of used books and magazines for sale at your local ReStore.
Remember to be imaginative. I’ve even been known to use labels from soup cans to create unexpected fun.

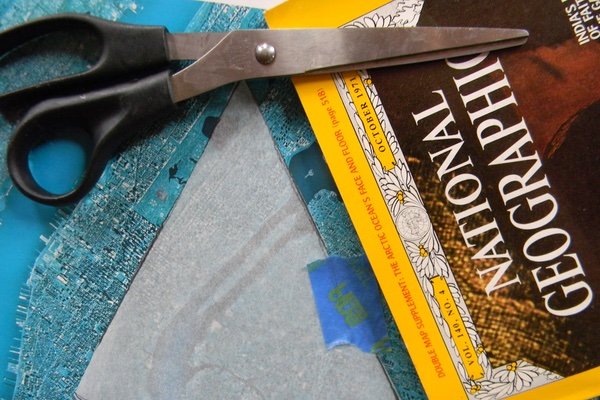
7. Cut the recycled images to your desired shape and size.
I placed tracing paper over the design I’d drawn onto the table top. I then outlined the shape of paper I needed to fill in a particular part of the design, cut out that shape from the tracing paper, and taped the cut out piece of tracing over the recycled image, before trimming around the edges.


8. Decoupage newly shaped papers over the areas you have not painted.
I recommend using a product like Mod Podge that you can purchase at your local craft store or even the closest Walmart.
First, brush the decoupage medium onto the surface of the table. Then place the image over the newly glued surface, pressing out any air bubbles, and apply another coat of Mod Podge over top to seal.

Repeat this process until all desired areas are covered with recycled images.
9. Detail edges.
You can use a permanent black marker and ruler to clean up and demarcate the lines between decoupaged and painted surfaces.
I also used a black and white checker board Duct Tape to create a border for my table. I cut the tape to the width I needed using an Exacto knife and yard stick.

10. Apply several coats of polyurethane to the entire table surface.
This seals and protects both the painted areas and the decoupaged images. I used an oil-based polyurethane, but a water-based Minwax polycrylic product would work just as well and dry even more quickly.

72HdrPBPCg,gyyig~~60_57")
Finished Product!

This is what it looks like in the end.Can you do it, as well?Absolutely. And absolutely, you must—if you don’t want to miss out on a coffee-table treasure of your very own.
You can follow us at: https://www.facebook.com/IdiomArt
love, Love, LOVE it — so fun to see you here Kathy!
Loved the beautiful table! Couldn’t see any mags. though. Did you just use for shape? Fantastic work of art!
Absolutely beautiful. Wonderful tutorial, thanks for sharing.